Virtual Training Layer #4: Love The Lens – Being Better On Camera At Work
When you’re delivering to remote participants, the camera is imperative. If attendees can’t meet you and feel a connection to you, many will check out in the opening minutes.
If you seem like just another reader-of-the-slides presenter, they’re off to check emails. Some tell us, “But c’mon, just put a photo and bio on your cover slide. Surely it will do the trick.” A photo is nice, yet it’s no longer enough. People are used to seeing their cousins do livestream videos with “How To Draw Your Eyebrows” tutorials, yet when it comes to important corporate training, too many of us cop out because it feels awkward or time consuming.
Video is so easy to do today that people assume you’re unprepared or that you don’t care about them if you won’t go on camera for training. Video is the #1 area of feedback that leads learners to say they feel like they’re in the room with us. Our on-camera approach covers these 9 tenets:
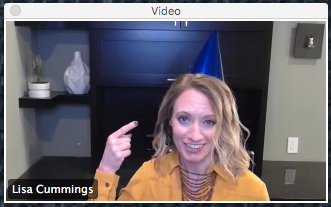
1. The Eyes Have It – Look At The Audience.
2. When You Look Away From The Lens, Do It Intentionally.
3. Leverage Your Hands as a Tool.
4. Use Props.
5. Be Extra Human.
6. Stop Distracting Yourself.
7. Get Over The Awkwardness of Being On Camera.
8. Know How The Camera Looks To Them.
9. Pick Your Wardrobe Carefully. Be especially wary of moire.
1. The Eyes Have It – Look At The Audience.
Presenters tell me constantly that they feel disconnected from the audience because they can’t see the attendees. If you’re the only one on camera (delivering a one way video stream), then you’re likely the only one who feels the lack of connection. They can see you, so they feel connected to you. Participants feel immensely connected to you if you are looking at them through the lens. Yes, it’s awkward at first, yet it’s absolutely possible to make a meaningful connection.
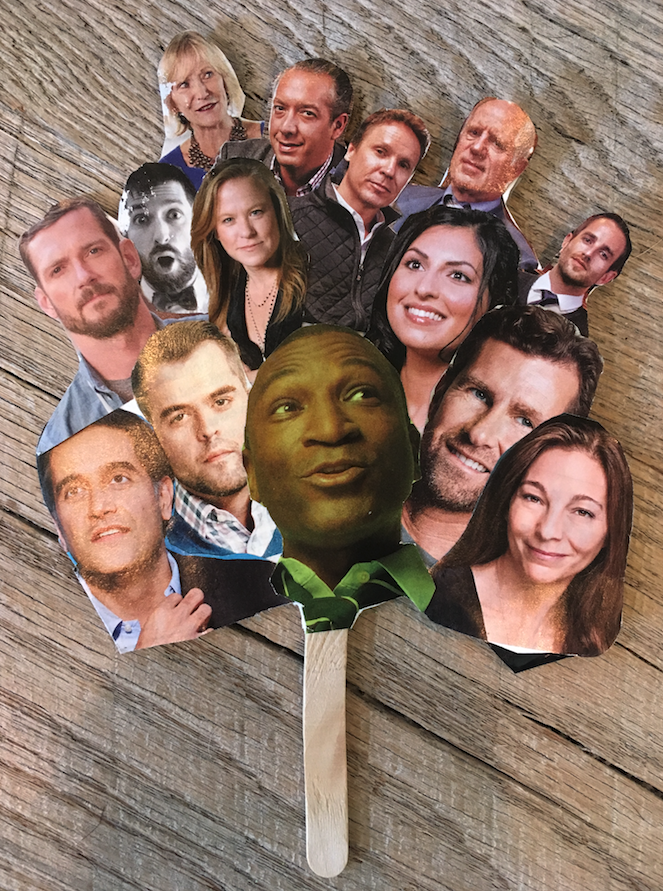
This one can be tough because as the facilitator, you can’t see any actual humans. Here’s a glance behind the scenes so you can see examples of tools I’ve used to overcome the strange paradox of trying to be warm while talking into a glass circle (the camera lens). Both tools are physical reminders of where the participants are so that you can imagine the audience in a more human way and know exactly where to look.
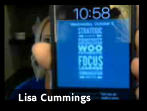
In the image, you’ll see the tool I used when I first got started. It’s a montage of people’s faces from a magazine. I taped it to the back of the camera lens to remember where to look. Yes, it is a goofy “people on a stick” tool, yet it worked! I used it for over a year, and it helped me understand what it means to help learners feel seen even when you can’t actually see them.

After I got more comfortable, I took one of the faces and put it on the camera’s lens cover. It’s a subtler way to remember where the humans are (behind your camera lens). I strategically selected the guy with the surprised face because he stands out and makes me take notice.
After you’ve used these tricks of the trade for 20 or 30 sessions, you probably won’t need tools like this any longer. It will feel natural to look in the camera lens. I leave “surprised guy” in place to this day. Even though I know where to point my eyeballs, the image of a human being always helps me feel reminded of the people behind the lens.
2. When You Look Away From The Lens, Do It Intentionally.
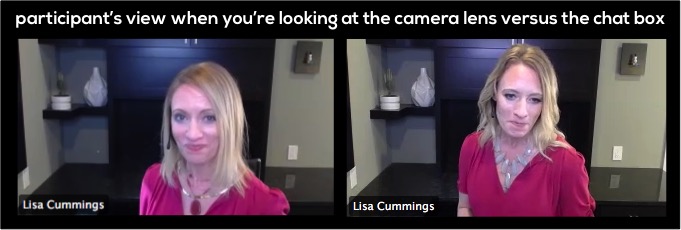
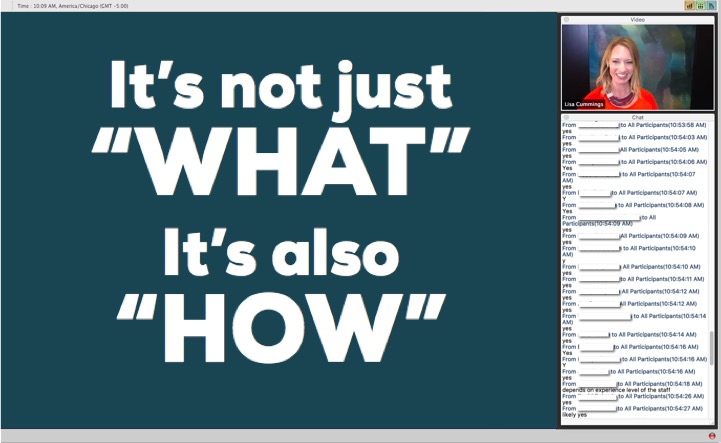
Sometimes facilitators look away because they don’t know where to look. They seem a little aimless with their eyes. That’s easy to fix (see tip #1 above). The other culprit that gets in the way of your eye contact is that you need to look at the chat box and the technology during your session.
In this image, you can see the difference between a moment looking in the camera lens versus a moment reading the chat box. It’s significantly different to your learners. I’ve seen too many events where the trainer is reading slides on screen or looking at his video thumbnail (of himself), and the person has no idea that he looks so strange to the attendees.
In our virtual training events, we often tell participants that we’re going to look off to the side and see where the chat is taking the conversation. I also mention at the top of the event that, “when you see my eyes go right here, you’ll know I’m reading the comments in the chat box.” That way, they won’t wonder if you have crazy-eyes syndrome or if you’re disconnected in an un-present way. Also, when you tell them that you’re going to take time to check in on their comments, they feel seen and appreciated for their contribution.
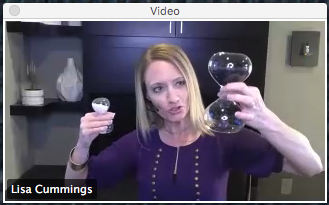
3. Leverage Your Hands As A Tool.

Another tip for maximizing your camera is to talk with your hands in a conscious way. The main difference in a virtual session is that you have to know where the camera frame is. If you talk with your hands as you do in your natural speech, they will be too low. And the viewer will see streaking glimpses of your thumbs. You’ll also want to record yourself delivering so that you can see if your hands are adding to the meaning or distracting people with blurry, nervous motion.
Note: when you see these images in a row, you might get the idea that I constantly have my hands in the camera frame. That’s definitely not the case. It’s sparse enough that participants don’t consciously notice them – your hands are simply tools that are embedded into the conversation.

In this training class, you can see that I demonstrated size, direction, and even a sensibility (in that first one, it was a “ready to punch” stance to poke fun at a comment about a colleague who was defensive and ready to punch the leader for his feedback).
You can add depth to your talking points by using your hands with purpose. Be sure to slow your motions down so that the camera doesn’t blur them out. Also know where the frame is so that you are conscious of the space at your collarbone and above. Of course, the “in frame” area will depend on how zoomed in you are. You can also control this by purchasing a webcam with zoom in/out capabilities.

You’ll want to practice this to be sure that you’re not too frenetic. When you look at examples in a film strip style here, you can see that your hands would be distracting if you left them in the frame during the entire session. Yet when you sprinkle them in to make a point during an 90-minute session, it’s a great way to add gravity to a talking point.

From left to right: this was a moment when a participant told a story about words he wished he could take back. Later in the session, I called back to that comment and made it look like I was pulling “bad manager moments” from my mouth (like a movie running in fast-backward mode). In the 2nd image, I’m doing a sound check. In the 3rd photo, I’m offering a deep, genuine “thank you” to a person who told a moving story about using her StrengthsFinder talent themes to avert getting fired. In the 4th image, I acknowledged that sometimes you get the feeling that someone is holding up a “stop” sign as they don’t want to receive your feedback. And in the 5th image, I called back to an example of competing priorities that you feel as a new manager – that your team members, your boss, and your peers often all want something different from you – and they need it now. The frenetic hands were a purposeful use of the blur of requests that constantly hit your inbox.
4. Use Props.
This is an easy win. It’s something I’ve seen almost no one else use. It’s a great way to feel more comfortable on camera because you’re focused on showing something useful to participants. You’re also physically keeping the item in the camera frame, so it’s nearly impossible to be fussing over whether you look strange or awkward in the camera.
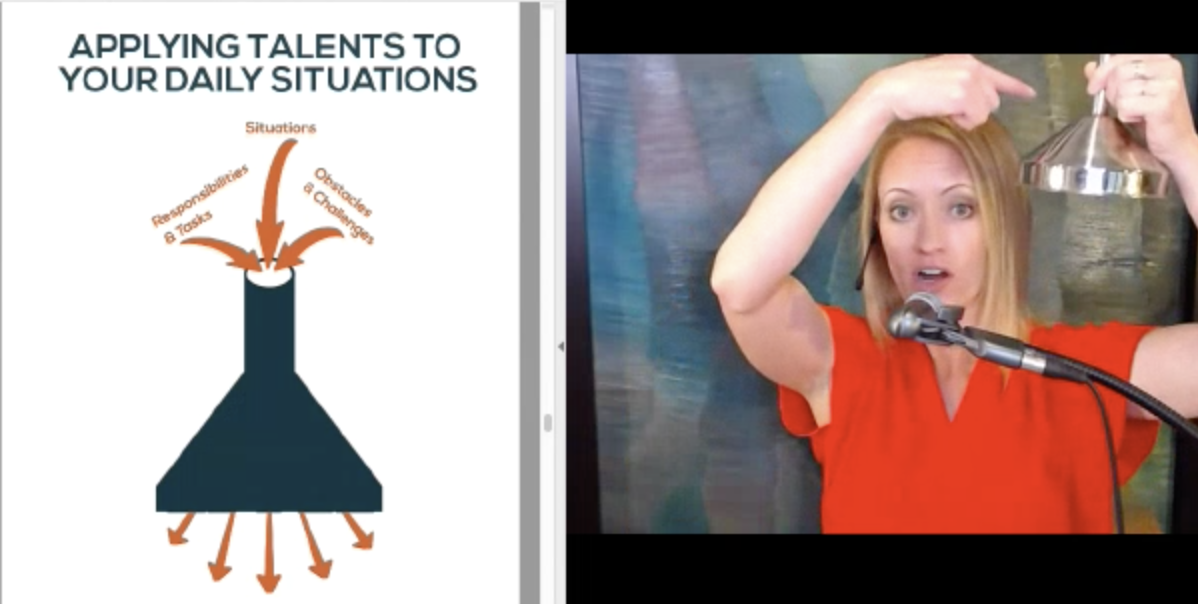
When you deliver virtual training, you can keep a drawer stocked with your items for each session. Sometimes a 2D image doesn’t tell the whole story. In the funnel example you see here, I contrasted how you usually have a funnel flipped the other way, where you put as much as you can in the top. Then I flipped it over to match the image in the slides.
Not only does it make the funnel metaphor more memorable to participants (people re-tell this application idea constantly), but it also helps you add more dimension to a concept than a flat 2D image on screen allows you to do.
 Here’s another example from a Wellbeing class. In the training event before this one, we each committed to bring something representative of how we “move” during the day. One person brought a photo of a treadmill desk. One person brought a fit bit. One person showed how her change in shoe choices led her to move more during the day (dang those high heels – they had been killing her wellbeing). This is another way to add weight to activities and to feel more connected to each other in a virtual setting.
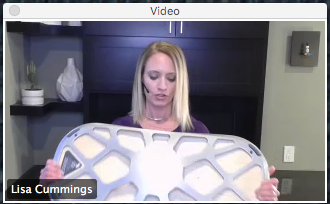
In one of our cohort-based events, I got the chance to celebrate someone’s leadership award. She earned a prestigious award (and big cash bonus) and recognition trophy for having the top employee engagement scores in her division. When she told us about the award, I was able to grab this party hat out of my prop basket and make the celebration extra special. It sounds silly, yet in a virtual room full of executives and senior managers, they hooted and hollered (with chats and emoticons) in a way that made the group more comfortable and lively with each other.
Note: after using the blue hat, I noticed the contrast was poor with the dark wood behind it. Now I use a silver hat so it shows up clearly on small screens.
 This phone prop image is a more of a literal example. During our StrengthsFinder training for teams, we talk about ways to keep your strengths top of mind. I show them things like 4×6 desk frames that list their Top 5 Talent Themes. In the image below, you’ll see that I showed them an example of my lock screen on my phone. Then we link them out to resources for making their own.
In most virtual platforms, you can put links, downloads, and resources right in the chat box so that people can download files in the moment. We prefer Zoom. It makes all of this simple in the chat box. In the Strengths Focused Leadership class, we add links in the chat so that they can download their personal lock screen images and share them with their teams. That way, they can each focus on one StrengthsFinder talent theme that month. Adding the “show and tell” version of the prop makes the idea stick a little more than if you just tell them about it verbally.
 This sand-timer prop came out in the moment. I was leading a virtual training on Building Personal Brand and Legacy Through Strengths. A few people felt like they were being indulgent to spend time working out their lifetime leadership legacy and overall career brand on company time. One person brought up the pomodoro technique as a way to dedicate 20 minutes of focused time. I happened to have pomodoro sand timers in my office, so we continued the conversation with a live discussion about applying their strengths in quick bursts. It led to an awesome conversation about how leading through your strengths is the opposite of indulgent because it amplifies your performance. Without using the prop in the moment as a way to acknowledge his hesitance, he may have written off the concept before giving it a try.
This 22-second video example on props seems a little “far out” (pun intended). Yet, it was a huge hit because it was a callback to a discussion from the week before. The week prior, we had a deep conversation about whether using strengths-based leadership was a pollyanna, naive approach that gave team members an excuse to do shoddy work. The guy who brought it was worried about people saying, “Whelp, that’s not in my strengths zone, so you should give that assignment to someone else or expect weakness-zone-quality-work.” It was well worth the $11 on Amazon to grab this prop (the sunglasses) after he made the comment.
Props are a fun way to make participants realize they’re directing the content and conversation the more they participate. They get more connected to each other and to the effort they’re putting into the learning. Literally, he made the comment. I ordered the glasses that day. The following week, I called back to his comment and put on the rose colored glasses. From there, he was a raving-fan-level participant for the rest of the program. You might not guess that a Sr. VP would be all-in because you bought a pair of silly sunglasses. Yet you can totally get it when you think about it. Everyone wants to be seen, heard, and appreciated. And these are the powerful moments you can use the camera for.
Note: the audio is scratchy because the client requested that we deliver the audio via their dial-in phone service. Phones are a bit off topic, yet it’s helpful to note that there’s always a VOIP option with high quality audio. That’s our default, and we help clients weigh pros & cons of the audio choices. For this client, it was the only way to reach some of their international participants with low bandwidth. It’s the same situation in the video above & below. In our Zoom platform, each participant can choose whether they use a landline or a connection through the internet.
5. Be Extra Human.
You know how people always say that the camera adds 10 pounds? Well it also adds 10 pounds of “boring” – for some reason, most people go from their light, enjoyable persona into a rigid, no-smiles-allowed-here identity. One of the best ways to overcome your fright of the camera is to simply be yourself. So often at work, people over-formalize their writing and speaking style simply because they’re at the office. In the virtual training world, that’s a death knell.
I don’t think anyone is trying to be fake or boring on purpose, yet the camera has a way of bringing out your most awkward and serious side (at the same time). Year after year, the more relaxed and human I allow myself to be, the more participants get out of the training. They feel more connected and willing to be vulnerable in front of their peers because that’s the tone in the room. They instantly notice that this is different from their typical webinar where they block the time off in their calendars, yet they fully intend to check their emails and listen to the training in the background. Here’s a 47-second video to give you a sense of some moments of humanity that totally changed the dynamic with the participants (in a great way). Allowing yourself this 3% of silliness in your session goes a long way.
The other tips for being human are more about letting you be you. In these photo strips, you’ll see moments where I cut loose for a second and let my fun-loving side out. It doesn’t mean the whole event is a goof-off. It does mean that you can be playful or expressive (or whatever makes you…well, you). People resonate with you so much more when they feel like they’re in the room with you. It’s like you’ve broken down that glass lens between you.

In these examples, you’re seeing me acting out their inner voice wishes. In the first image on the left, she said she sometimes feels like she’s “mom-ing” her team with “clean your room” type of admonitions. And when someone said he just needs 10 seconds of ohm before an important meeting. And when you wish your direct reports would jump up and down yelling, “pick me, pick me.” You also see me calling myself out in the 4th image. And then in the 5th image, I’m playing along with a camera swat when a leader gave a ridiculous answer about how to handle a disagreement and a colleague told him to go to the naughty penalty box.

In these images, you simply see more of the natural facial expressions that people try to strip out of their training. Some, like the first one, actually help people understand that you asked a question and you’re waiting for them to write their answer in the chat. Then as you move down the line you see things like surprises and scrunchy faces. In the last one, I’m making a joke about how we sometimes wish that top talent would fall from the sky. From there, we got into the realities of what it takes to develop their team to be at their best. I’m not suggesting that you should go practice scrunchy faces if that’s not something you’d naturally do. What I’m saying is that the more you allow your natural expressions to come through, the more people will connect with you and your content.

In this last row, you see other angles of “being human.” For example, in the 2nd photo, someone asked how I did such a good job of looking at them and making a connection that felt so real. It led me to show them the trick I was using at the time (the people on a stick you saw in #1). We got a good laugh, and it made stronger bonds in the cohort. In the last image, you see something simple, yet necessary. That’s drinking water. As a human, the attendees are fine with you if you drink water in front of them. Use a straw so you don’t have to look like you’re in chugalug mode. It’s worth thinking about what you’ll drink out of and how it appears on camera. For example, if you use a disposable, thin water bottle (the kind you buy in cases), the participants will likely hear a jolting crackling sound in your lapel microphone every time you pick it up.
6. Stop Distracting Yourself.
With all of those images of me above, you might think I love to look at myself, yet I don’t. During virtual training and speeches, I figure out where to stand to be in the camera frame and then I minimize it so that I don’t distract myself.
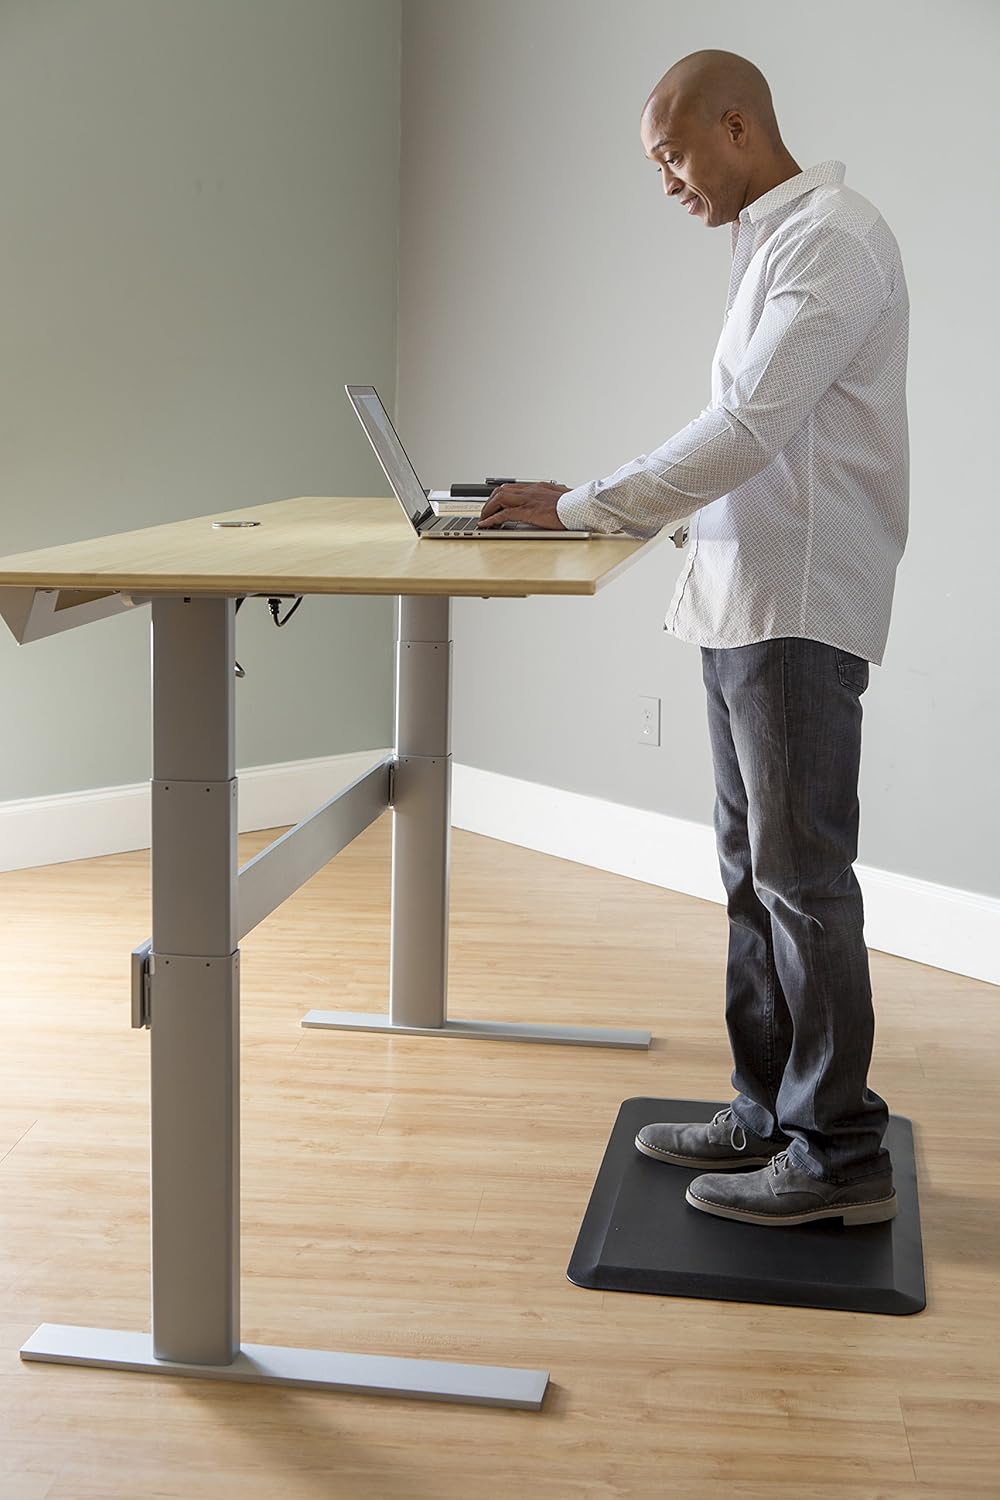
 A helpful tip is to give yourself a small mat to stand on (yes, I think you should always stand up because it makes you more energetic on camera). I use an anti-fatigue mat.
Now imagine standing on this mat with your monitor and camera in front of you. The mat tells you exactly where to stand (without needing to peek at the screen to see if you’re in view) because if you step off of the mat you step out of frame. You can also mark the floor with tape, yet that requires you to look down, so it’s way less effective.
I think this is important because if you look at yourself in the camera feed, you start to worry about out-of-place hairs and things that take your attention off of the participants.
Don’t worry if you don’t have a fancy stand-up desk. In one of the studios I use, there is no desk because I only use it for virtual training. In that situation, I use two portable music stands. Lay them flat and you’re good to go. Based on where you set them up, they tell your body exactly where you should stand for the camera.
7. Get Over The Awkwardness of Being On Camera.
So you hate being on camera? Do you feel awkward or dorky or forced? Don’t worry. At one time, I felt like that too. It’s easier than you think to get over it. It’s a mind shift. Here it is:
Make it about the participants, not about you.
As soon as you get your mind off of yourself, it all changes. Focus on the value you want to add to their lives. Focus on the thing you want them to learn. Pay attention to their experience and their needs. Once you shine the spotlight on them, it is off of you. And you’ll forget that you’re feeling awkward.
8. Know How The Camera Looks To Them.
In virtual training platforms, your host view of the technology is often different from the participant’s view. Do a test event where you can open the session in another window as a guest participant. Do it on your mobile device or a second system to see how everything displays. If you’re working with a producer, have that person log in as a guest and send you a screenshot. There are a lot of details to mess with. Each software has a different design.
Here’s an example of different sessions we’ve facilitated in clients’ software. All of the big platforms have an active deck, video, chat, and participant window, yet it’s different in each one. Sometimes participants can control and resize each element on their own, and sometimes you control the layout. These are all things you need to test in advance.
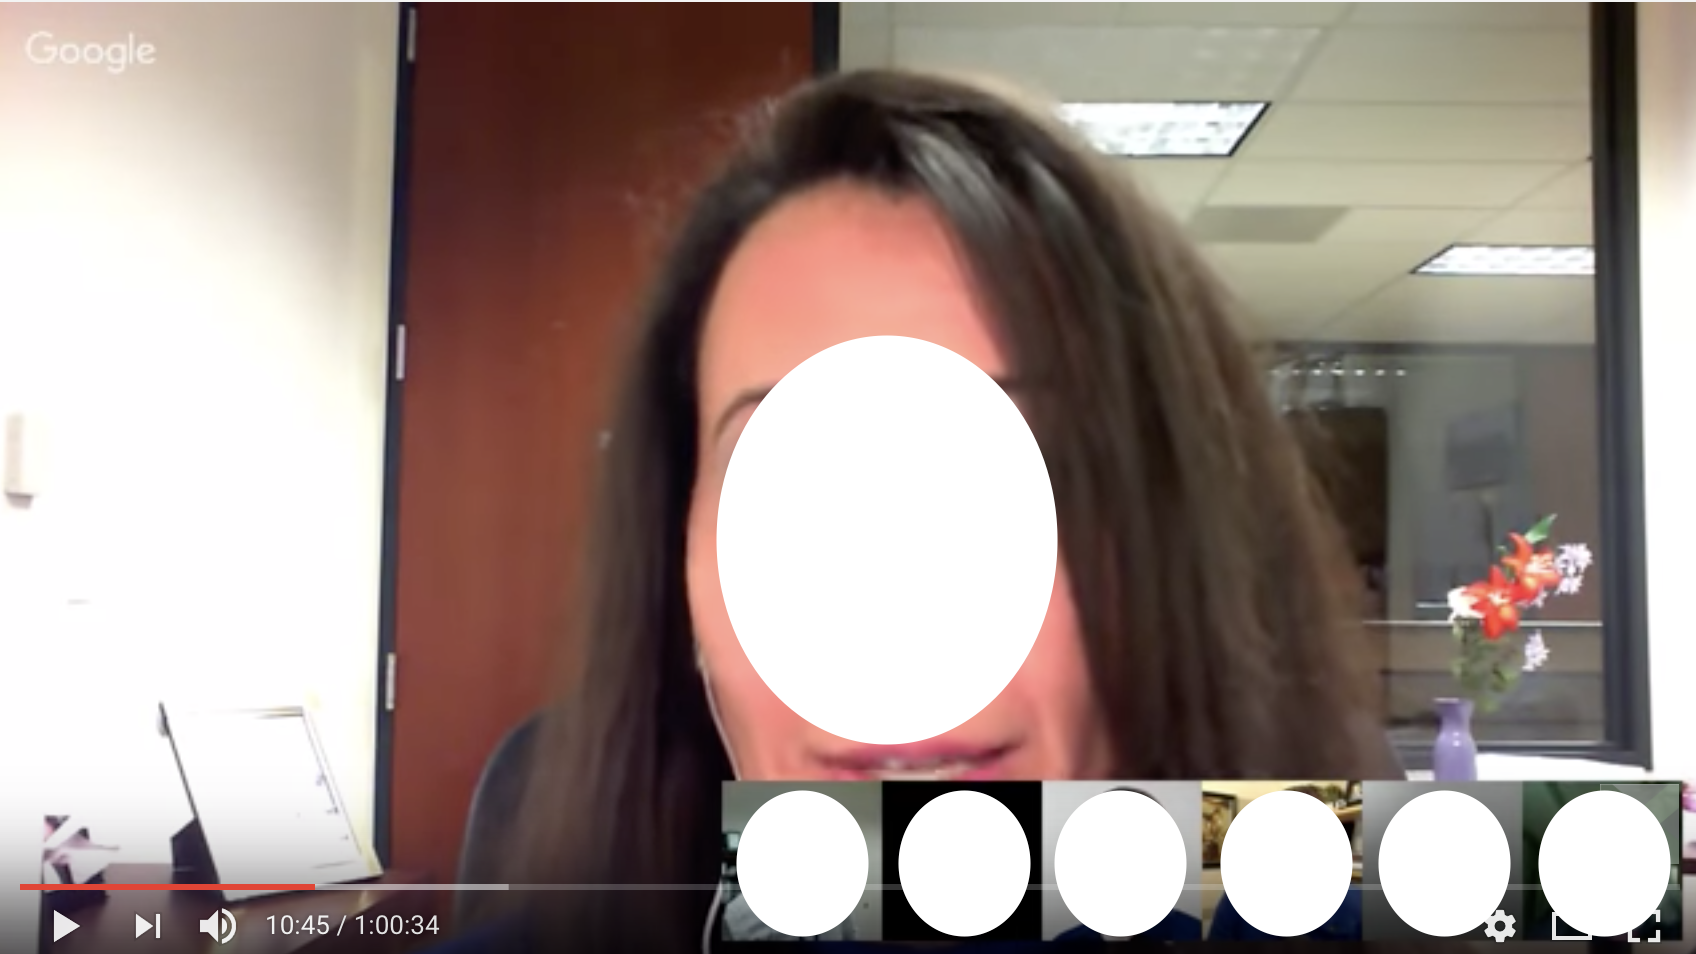 Here’s a final thought on knowing what your participants will see in each piece of software. In the photo, you see an example of a session I attended where the software cut off part of the presenter’s face, yet she didn’t know it (because it added the other people as a thumbnail on top of her camera view). I covered up the faces with white circles to mask her identify. She was offering an awesome training moment, and it was foiled by the boxes covering up her mouth.
Even in software that doesn’t add this surprise overlay, most of the platforms populate your username over the top of the video feed, which can cause two issues if you’re not aware. 1) you can be too zoomed-in, and it can cut off your chin, or 2) if you didn’t enter the room properly, it will label you as “Guest 1” or something strange like you see in the photo strip in Tip #3 above. The name overlay feature is in WebEx, Adobe Connect, Saba Meeting, Go To Training, and Go To Webinar. Almost all of them do this, so be aware. In our Zoom recordings, it does not add the overlay, which we love!
9. Pick Your Wardrobe Carefully.
On the surface this sounds like a strange item. It’s not. Black shirts suck all the light in. White shirts reflect light too strongly. Patterns give you a psychedelic fuzz look because you have moire to contend with. I know, the word moire sounds like a skin condition, yet read on if you tend to wear shirts with patterns. The bottom line is that bad clothing choices create distractions for your learners and make it tough for them to pay attention to the content and conversation.
In my opinion, these are the four major areas that foil a good virtual training. A) Light reflecting or sucking-in colors, B) Lack of contrast with your background, C) Jewelry, and D) Distracting clothing (including eyeglasses). Here’s the skinny on each one.
For item A – Light-Reflecting Colors Or Light-Sucking Colors, know that wearing a solid black or solid white shirt may cause issues for your camera. Even talented photography and video pros have challenges with these colors, so remember that your auto-focus lens on your webcam will have a tough time.
Here’s an example of a moment when I made a bad choice and wore white. I was trying to get better contrast with the dark background, yet you can see how it’s reflecting light harshly. It makes your eyes go to the bright spot on my shoulder (and feels like your eyes are burning). As a side note, also see how small things in the background show up. There’s a white wall outlet in the cabinet that caused distraction to the eye, so I had it replaced with a black one.

For item B, watch out for clothing that blends with the background behind you. If you deliver in alternating training rooms or conference spaces, it’s important to scope this out in advance.
In the images, you can see some bad choices I made before realizing the impact of good contrast. Those shirts and blazers were all too similar to the brown in the desk colors. If you blend in with your background, you’ll look like a floating face on the screen.
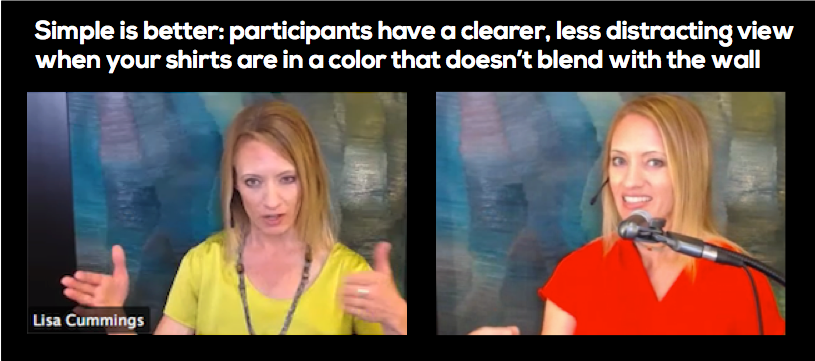
To give you an improved view of item B – Background Contrast, here’s an example of contrasting colors. I hadn’t been a bright-shirt-wearer before doing lots of virtual training. When it was time to step up my craft and look into the details of what makes a good experience, these bright color choices stood out (pun intended).
As soon as I bought some bright “virtual training shirts,” clients and participants starting commenting on better video feed and audio quality. Nothing had changed in the technical audio/visual areas, yet the shirt color made a positive difference. These are the small, unconscious perception items that help everything roll smoothly.
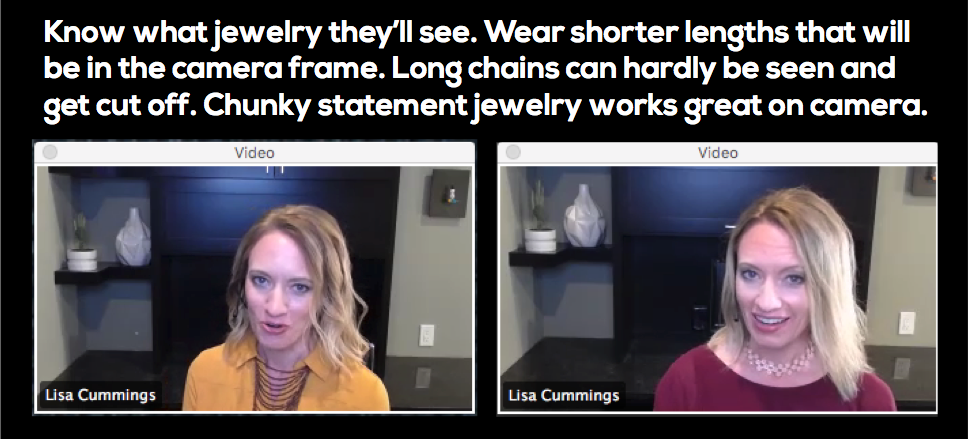
For item C – Jewelry, keep a few things in mind if you wear accessories that will be in the camera frame. One is that most chains cannot be seen very well, so be sure to test that. Also notice that anything under your shoulders doesn’t exist to the attendee, so make your selections with that in mind. This goes beyond the jewelry topic, yet be careful of deep scoop necks. They can make you appear semi-naked if you are zoomed in.
Choker length and statement jewelry seems to work well. You can also use your shirts strategically – mock necks and collar details show up nicely in virtual training.
For guys and gals who wear oxford shirts, your collar has the same effect as jewelry, so make sure it’s pressed the way you like. A slouchy, folded collar can make you seem sloppy, even when the rest of the shirt is in perfect shape. The bottom line is that your neck has an outsized effect in virtual events, so you’ll want to pay attention to that area.
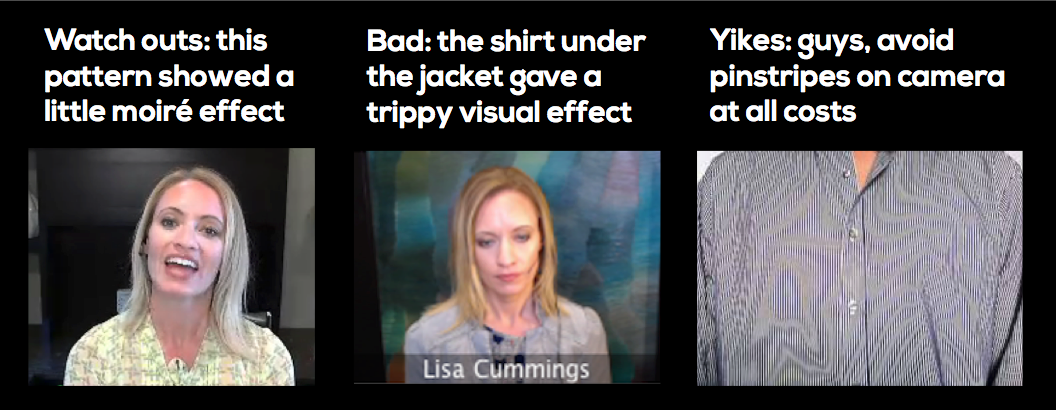
For item D – Distracting Clothing, watch for wearables that might distract your learners. One of the worst is an effect called moire. It’s when the pattern in your shirt translates into the lens with a psychedelic appearance. It’s distracting and strange looking to the viewers. The best way to avoid this is to wear solid colors when you deliver virtual training. Voila – no moire effect to worry about.
In addition, watch out for distracting accessories. For example, a pair of bright, dangly earrings might be a problem. Or a hair clip that captures the camera lens in a weird way.
Eyeglasses can be challenging because the glare keeps reflecting against the lens. In my first video below, you can see how I wore a shirt with a metal piece that flashed light at you as I moved. No bueno! In the second video, you get some tips for working with eyeglasses. The gist is to adjust your lights, your body, or even the tilt of your glasses to catch less glare.
That’s it for my on-camera lessons learned. It’s crazy to think that this list is ginormous, yet it is still not exhaustive. Be sure to catch the entire series by checking out the other 4 Layers in our virtual training philosophy:


I’d love to exchange tips and ideas with others who nerd out on virtual training and webinars. Share your favorites on Twitter to keep the conversation going.
[Tweet “@lisacummings my VILT tip is:”]

As an international speaker and facilitator, Lisa Cummings has delivered events to over 15,500 participants in 14 countries. You can see her featured in places like Harvard Business Publishing, Training Magazine, and Forbes. She specializes in virtual StrengthsFinder training for teams. When she’s not out spotting strengths in people, you’ll find her playing drums, rescuing dogs, or watching live music in Austin, TX. Her Top 5 StrengthsFinder Talents are: Strategic | Maximizer | Positivity | Individualization | Woo.